|
|
7 years ago | |
|---|---|---|
| doc | 9 years ago | |
| examples | 9 years ago | |
| inc | 9 years ago | |
| .gitignore | 9 years ago | |
| .gitmodules | 9 years ago | |
| README.md | 7 years ago | |
| TextSuite.lpk | 8 years ago | |
| TextSuite.pas | 8 years ago | |
| copyright.txt | 10 years ago | |
| utsChar.pas | 9 years ago | |
| utsCharCache.pas | 9 years ago | |
| utsCodePages.pas | 9 years ago | |
| utsConstants.pas | 9 years ago | |
| utsContext.pas | 9 years ago | |
| utsFont.pas | 9 years ago | |
| utsFontCreator.pas | 9 years ago | |
| utsFontCreatorFreeType.pas | 7 years ago | |
| utsFontCreatorGDI.pas | 9 years ago | |
| utsFreeType.pas | 7 years ago | |
| utsGDI.pas | 7 years ago | |
| utsImage.pas | 9 years ago | |
| utsOpenGLUtils.pas | 9 years ago | |
| utsPostProcessor.pas | 7 years ago | |
| utsRenderer.pas | 9 years ago | |
| utsRendererOpenGL.pas | 9 years ago | |
| utsRendererOpenGLES.pas | 9 years ago | |
| utsTextBlock.pas | 9 years ago | |
| utsTextSuite.pas | 9 years ago | |
| utsTypes.pas | 9 years ago | |
| utsUtils.pas | 7 years ago | |
README.md
Overview
TextSuite 2.0 is altered from the original TextSuite written by Steffen Xonna (aka Lossy eX).
TextSuite 2.0 is a class library to manage, manipulate and render texts in an object oriented way. It supports multiple renderers, linke OpenGL or OpenGLES and also a bunch of font creators like GDI or FreeType.
The idea behind TextSuite is that you instantiate a font renderer suitable to your application (e.g OpenGL). When ever you want to render a text, TextSuite looks up the separated glyphs inside the cache of the renderer. If the glyph is not yet cached, it is loaded from one of the font creators you could specify. You could use multiple font creators (e.g. GDI and FreeType) in one application. The glyph loaded from the creator is stored in an image. Before the image is cached inside the renderer you could apply some post processors like border, color fill, pattern fill or shadow to it. When all glyphs, needed by the text you want to render, are stored in the render cache, TextSuite will place the glyphs on the screen. All text wrapping or spacing is automatically done by TextSuite.
TextSuite is written modular, so you can implement your own font creators, renderers and post processors.
Examples
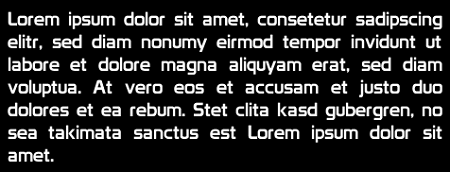
For better understanding I want to provide some small and simple examples. The first example uses GDI as font creator and OpenGL as renderer. The second one will do some post processing on the rendered text.
A simple GDI example
First of all we need to create our TextSuite context, the renderer and the font creator. The context is used to store all data needed by TextSuite. You should create only one context in your application. Make shure you hava a valid OpenGL render context before you create the OpenGL renderer.
var
  tsContext: TtsContext;
  tsRenderer: TtsRendererOpenGL;
  tsFontCreator: TtsFontCreatorGDI;
tsContext  := TtsContext.Create;
tsRenderer := TtsRendererOpenGL.Create(tsContext, TtsFormat.tsFormatAlpha8);
tsCreator  := TtsFontCreatorGDI.Create(tsContext);
This is the basic setup you need in your application. Now you can start to load the fonts you want to use. If you want to use a font repeatedly you sould store it somewhere and reuse it everytime you need it.
var tsFont: TtsFont;
tsFont := tsCreator.GetFontByFile('./my-font-file.ttf', 20, [], TtsAntiAliasing.tsAANormal);
Now everything we need for rendering is initialized and we could draw some fany text.
var block: TtsTextBlock;
glEnable(GL_BLEND);
glBlendFunc(GL_SRC_ALPHA, GL_ONE_MINUS_SRC_ALPHA);
block := tsRenderer.BeginBlock(0, 0, 480, 320, [TtsBlockFlag.tsBlockFlagWordWrap])
try
  block.HorzAlign := TtsHorzAlignment.tsHorzAlignJustify;
  block.ChangeFont(tsFont);
  block.ChangeColor(tsColor4f(1.0, 1.0, 1.0, 1.0));
  block.TextOutW('Lorem ipsum dolor sit amet...');
finally
  tsRenderer.EndBlock(block);
end;
glDisable(GL_BLEND);
The text block is used to store all information you written in code. The TextOut method will store the passed text using the current settings. This means that you could render text with two different colors in one text block, just the color, write text using TextOut, change the color and write another text.
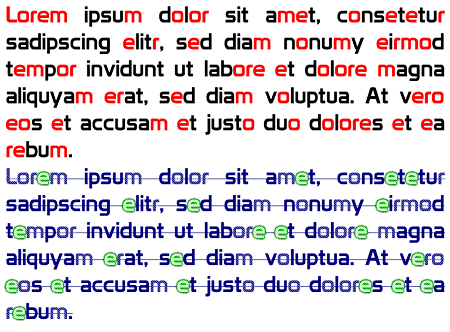
A post processing example
Before we start with post processing we need to create the context, the font creator and the renderer, like in the example before.
var
  tsContext: TtsContext;
  tsRenderer: TtsRendererOpenGL;
  tsFontCreator: TtsFontCreatorGDI;
tsContext  := TtsContext.Create;
tsRenderer := TtsRendererOpenGL.Create(tsContext, TtsFormat.tsFormatAlpha8);
tsCreator  := TtsFontCreatorGDI.Create(tsContext);
Now we can create some post processors. We will create two lists of post processors, the first will fill all chars with black, that are not equal to ‘L’, ‘o’, ‘r’, ‘e’ or ‘m’ and all other characters with red. The second post processor will fill all character equal to ‘L’, ‘o’, ‘r’, ‘e’ or ‘m’ with a striped pattern, all characters not equal to ‘e’ will be filled with dark blue and all characters equal to ‘e’ will get a green border. So let’s start.
var
  pp: TtsPostProcessor;
  img: TtsImage;
  tsPostProcessor1: TtsPostProcessorList;
  tsPostProcessor2: TtsPostProcessorList;
const
  PATTER_DATA: array[0..15] of Byte = (
    $FF, $BF, $7F, $BF,
    $BF, $FF, $BF, $7F,
    $7F, $BF, $FF, $BF,
    $BF, $7F, $BF, $FF);

{ Post Processor 1 }
tsPostProcessor1 := TtsPostProcessorList.Create(ftsContext, true);

// fill characters _not_ equal to 'L', 'o', 'r', 'e' or 'm' with black
pp := TtsPostProcessorFillColor.Create(ftsContext, tsColor4f(0, 0, 0, 1), TS_IMAGE_MODES_REPLACE_ALL, TS_COLOR_CHANNELS_RGB);
pp.AddChars(TtsCharRangeUsage.tsUsageExclude, 'Lorem');
tsPostProcessor1.Add(pp);

// fill characters equal to 'L', 'o', 'r', 'e' or 'm' with red
pp := TtsPostProcessorFillColor.Create(ftsContext, tsColor4f(1.0, 0.0, 0.0, 1.0), TS_IMAGE_MODES_MODULATE_ALL, TS_COLOR_CHANNELS_RGB);
pp.AddChars(TtsCharRangeUsage.tsUsageInclude, 'Lorem');
tsPostProcessor1.Add(pp);

{ Post Processor 2 }
tsPostProcessor2 := TtsPostProcessorList.Create(ftsContext, true);

// fill characters equal to 'L', 'o', 'r', 'e' or 'm' with striped pattern
img := TtsImage.Create(ftsContext);
img.CreateEmpty(TtsFormat.tsFormatAlpha8, 4, 4);
Move(PATTER_DATA[0], img.Data^, 16);
pp := TtsPostProcessorFillPattern.Create(ftsContext, img, true, tsPosition(0, 0), TS_IMAGE_MODES_MODULATE_ALL, TS_COLOR_CHANNELS_RGBA);
pp.AddChars(TtsCharRangeUsage.tsUsageInclude, 'Lorem');
tsPostProcessor2.Add(pp);

// fill characters _not_ equal to 'e' with dark blue
pp := TtsPostProcessorFillColor.Create(ftsContext, tsColor4f(0, 0, 0.5, 1), TS_IMAGE_MODES_REPLACE_ALL, TS_COLOR_CHANNELS_RGB);
pp.AddChars(TtsCharRangeUsage.tsUsageExclude, 'e');
tsPostProcessor2.Add(pp);

// add green border to characters equal to 'e'
pp := TtsPostProcessorBorder.Create(ftsContext, 3.0, 0.5, tsColor4f(0.0, 0.5, 0.0, 1.0), true);
pp.AddChars(TtsCharRangeUsage.tsUsageInclude, 'e');
tsPostProcessor2.Add(pp);
After our post processors are created, all we need to do is to create the fonts and assign the post processors to it.
var
  tsFont1: TtsFont;
  tsFont2: TtsFont;

ftsFont1 := ftsCreator.GetFontByFile('./my-font-file.ttf', 40, [], TtsAntiAliasing.tsAANormal);
tsFont1.PostProcessor := tsPostProcessor1;

tsFont2 := ftsCreator.GetFontByFile('./my-font-file.ttf', 40, [], TtsAntiAliasing.tsAANormal);
tsFont2.PostProcessor := tsPostProcessor2;
Now let’s render some text.
var block: TtsTextBlock;
glEnable(GL_BLEND);
glBlendFunc(GL_SRC_ALPHA, GL_ONE_MINUS_SRC_ALPHA);
block := tsRenderer.BeginBlock(0, 0, 480, 320, [TtsBlockFlag.tsBlockFlagWordWrap])
try
    block.HorzAlign := TtsHorzAlignment.tsHorzAlignJustify;

    block.ChangeFont(tsFont1);
    block.TextOutW('Lorem ipsum dolor sit amet...' + sLineBreak);

    block.ChangeFont(tsFont2);
    block.TextOutW('Lorem ipsum dolor sit amet...');
finally
  tsRenderer.EndBlock(block);
end;
glDisable(GL_BLEND);


